|
|
1. Adding Goods Receipts
Inventory>>Orders/Receipts>>Goods Receipts
Note: For audit purposes, normal practice is to link every GR to a corresponding PO. However, if Parameter 1360 is ticked, a PO number is not required when creating a GR.
|
1.
|
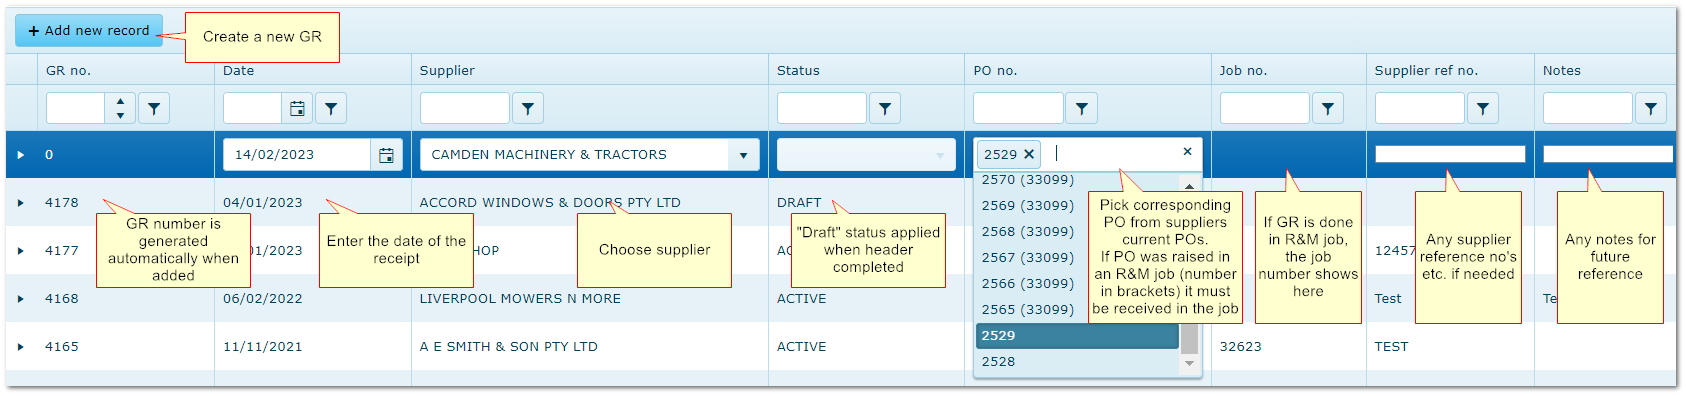
Click "Add new record" and enter header details. Only suppliers ticked as "Inventory" in the Supplier reference file can be selected.
|
|
2.
|
Status defaults to "Draft" (see below).
|
|
3.
|
Select the corresponding PO number. Only PO numbers related to the chosen supplier will be displayed.
Orders raised from within an R&M job show the job number in brackets and must be receipted from the originating job. This helps to ensure R&M staff are aware of the delivery. However, POs/GRs completed in R&M still display in the Inventory module.
|
|
4.
|
Enter additional data and click Update.
|
|
5.
|
The GR will open to display the parts on the corresponding PO. Amend quantities etc as necessary. Click Receive to complete the process.
|
|
6.
|
When any parts in the GR are received, status updates to "Active".
|
|
7.
|
If the received quantity is less than the order quantity, a back order is created.
|
|
8.
|
Change Status to "Closed" when no further parts are to be received on the PO/GR. This hides the GR from the default view.
|
Creating a new Goods Receipt
2. GR Status
Draft
|
Status is Draft until at least one of the parts is receipted.
In Draft, the GR can be edited and additional parts added.
|
Active
|
Applied automatically when the "Receive" button is clicked.
When Active, no further parts can be added and the supplier and related PO number (if any) cannot be changed.
|
Closed
|
When the GR is complete and all parts have been received, change the status to Closed by clicking Edit and using the drop down Status menu.
|
3. Editing GR Details
Edit options depend upon the status of the GR as follows:
Change Requirement
|
Allowed Status
|
Action
|
|
Date of GR
|
Draft and Active
|
Click "Edit" in the GR header row
|
|
Supplier of GR
|
Draft
|
Click "Edit" in the GR header row
|
|
Supplier Ref Number
|
Draft and Active
|
Click "Edit" in the GR header row
|
|
PO number attached to GR
|
Draft
|
Click "Edit" in the GR header row
|
|
Status (Active to Closed)
|
Active
|
Click "Edit" in the GR header row
|
|
Comments
|
Draft and Active
|
Click "Edit" in the GR header row
|
|
Add additional parts
|
Draft
|
Open the GR accordion and click "Add new record"
|
|
Delete parts
|
Draft and Active
|
Open the GR accordion and click "Delete"
|
|
Attach parts to a R&M job
|
Active
|
Open the GR accordion and click "Attach to Job"
|
4. Deleting GRs
Generally, GRs should not be deleted. It can create a negative stock quantity.
When the status is changed to Closed they will be hidden from the normal view.
If a GR is deleted, available quantities are adjusted as if the parts were never received.
If those parts have been issued prior to deletion, it can result in a negative stock quantity.
Example:
Action
|
Result
|
|
1. Available Qty = 0
|
|
|
2. GR Receipt Qty = 1
|
Available Qty = 1
|
|
3. Issue Qty = 1
|
Available Qty = 0
|
|
4. Delete GR
|
Available Qty = -1
|
If this has occurred, enter an adjustment for the part in the Inventory>>Part details>>Stock Adjustment tab
End of chapter.
|
|