|
1. Introduction
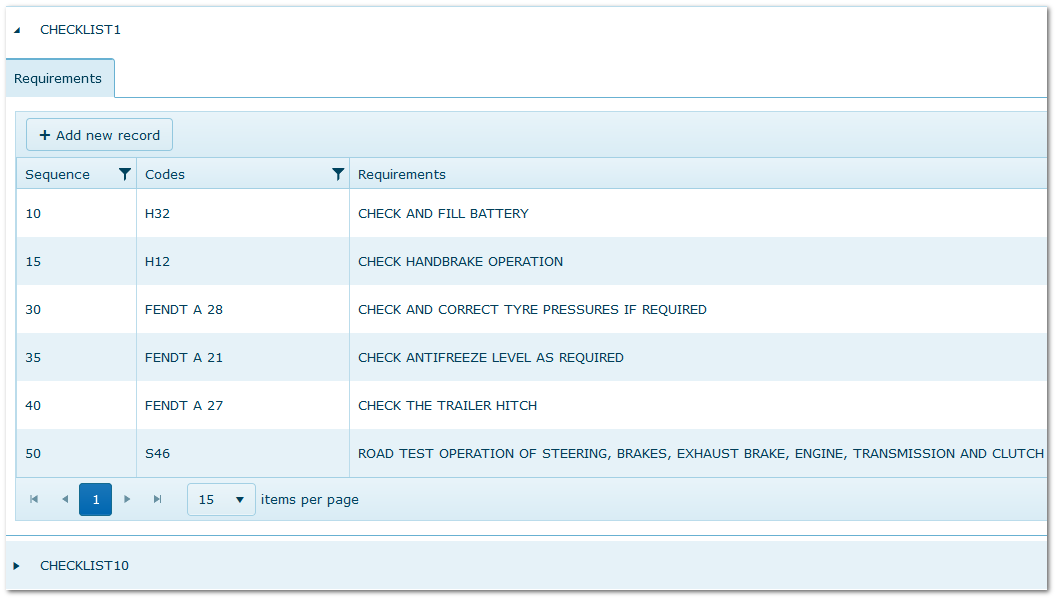
A Checklist consists of one or more R&M Requirements. Unlimited Checklists can be created.
One Checklist can be allocated to each asset along with a frequency.
Checklists are designed to be carried out by drivers on a predetermined frequency.
Checklists are designed to be completed using the AusFleet Checklists App but the option to print hard copies and enter results manually is available in Repair & Maintenance>>Checklists
See also: Pre-Start Checklists Vs Periodic Checklists
2. Reference Files
More>>Reference Files>>Repair & Maintenance>>Checklists
The requirements you will use to build your Checklists come from the Repair & Maintenance>>Requirements reference file, so you need to complete that first.
To create a checklist...
•Enter a name for the Checklist and click the "Update" button.
•Add Requirements to the Checklist in the accordion.
•The order each check is listed for completion can be changed by amending the "Sequence Number" in the first column.
•To locate a particular requirement, type into the "Requirement" column.
A Checklist Created in Reference Files
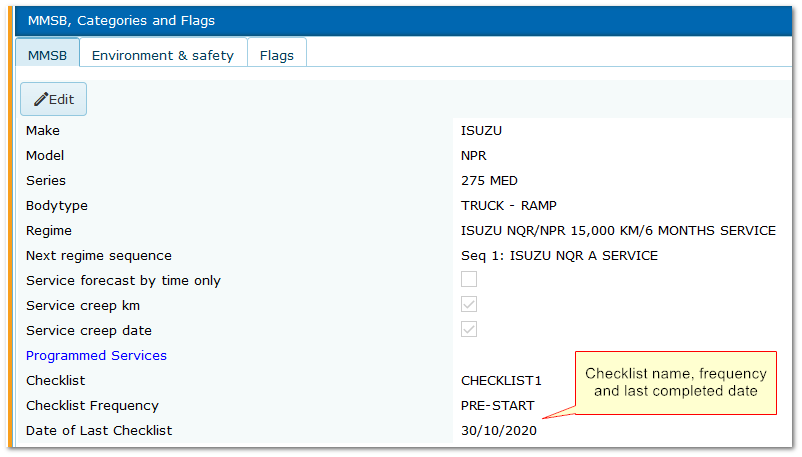
3 Allocating Checklists to Assets
Fleet>>MMSB, Categories and Flags
•Select the correct Checklist for the asset
•Set the frequency - Pre-start tells AusFleet the check is required every time the asset is used and details are separated for reporting
•Set date of last checklist on first use to start the count to next required check. It then updates automatically after each check
A Checklist Allocated to an Asset in Fleet Module
4. Parameters
More>>Parameters>>Flags & Settings
The following settings relate to Checklists module. A tool tip explaining the effect of each appears when the cursor is placed over them.
Parameter 1830 has no effect unless 1820 is ON.
1830 OFF: Supervisor receives notification of all checklists
1830 ON: Supervisor receives notification of only failed checklists

5. Templates
More>>Templates
The following templates are available for Checklists and may be edited as required.
|
Print Checklist
|
Create the Checklist form that will generate in pdf format if you need to print paper copies.
The Requirements list automatically formats as a table with Pass/Fail and Description columns.
|
|
Submitted Checklist Email
|
Sent if parameter 1800 is ON to notify the checker and their manager that the checklist has been submitted
See also Parameter 1830 - only send email in the case of failures.
|
|
Submitted Checklist Email to Depot Supervisor
|
Sent if parameter 1820 is ON to notify the Depot Supervisor that a checklist has been submitted.
See also Parameter 1830 - only send email in the case of failures.
|
|
Periodic Checklist (Upcoming)
Not used for Pre-start checklists.
|
Create an email that will be sent to the asset's allocated driver to advise them that they need to complete a periodic checklist on their vehicle.
The email is sent automatically 7 days before the due date, based on the last completed checklist date.
Email may also be manually sent to driver's manager and Depot Supervisor from within the module.
|
|
Periodic Checklist (Overdue)
Not used for Pre-start checklists.
|
Create an email that will be sent to the asset's allocated driver to advise them that they have not completed their periodic checklist by the due date.
The email is sent manually from the Checklist module.
Email may also be sent to driver's manager and Depot Supervisor from within the module.
|
6. User Rights and Other Requirements
More>>User Rights
Drivers who will use the app need an AusFleet user name in Personnel module and User Right 390.2.
Right 390.2 does not affect your licensed user count
Administrators who will use the Checklist module to manage incoming results need User Right 390.1.
Right 390.1 will affect your licensed user count.
It is recommended to create new R&M "Job Levels" to help prioritise defects (More>>Reference Files>>Repair & Maintenance>>Job Level).
When creating jobs from failed checklists, the priority can then be set easily using the Job Level.
Examples:
•Priority 1: Grounded
•Priority 2: 14 days
•Priority 3: 30 days
|