|
1. Requirements
More>>Reference Files>>Repair & Maintenance>>Requirements
Requirements are the individual tasks that must be completed to finish a job.
They may be added to a job individually or via a Service Kit.
•When included in a Service Kit as part of a Service Regime, the requirements are added to the job automatically when the service job is created
•Requirements can be simple ("Carry out service") or detailed (each individual task is itemised) depending on your needs
•Each Requirement need only be created once and added to different Kits
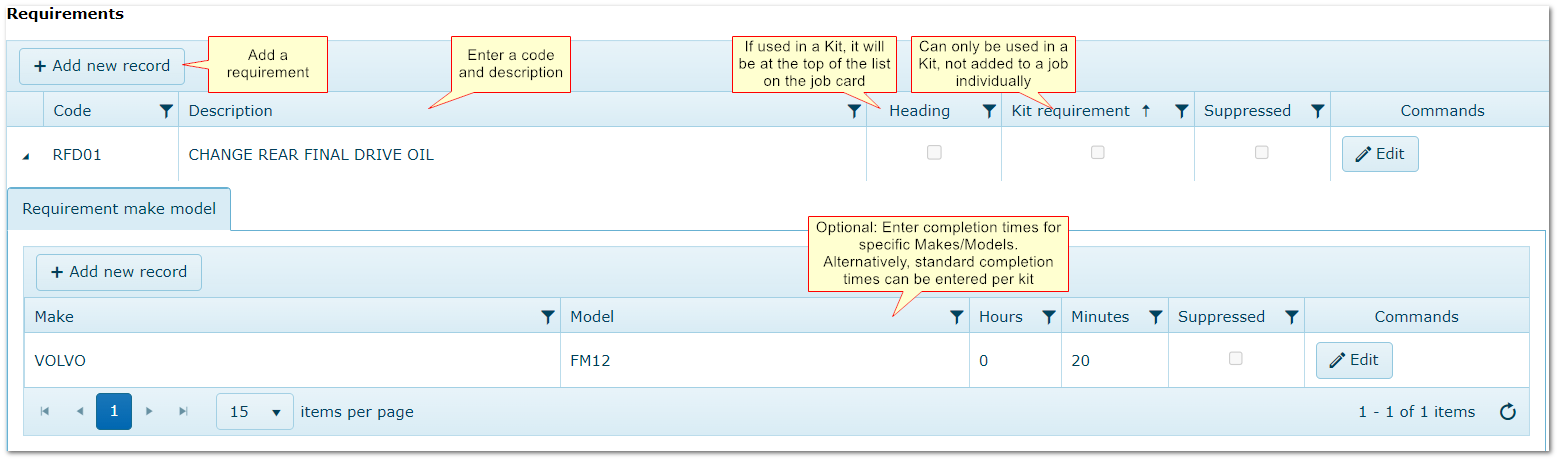
1.1 Adding Requirements
Enter details as shown to create a list of requirements that can be used to create Kits or added individually to jobs..
Requirement Make Model:
You can enter different estimated completion times for specific makes/models.
E.g. an oil change may take longer on one vehicle than another.
This level of detail is time consuming to set up and entering a standard flat rate time against the Kit is more usual.
2. Parts
More>>Reference Files>>Repair & Maintenance>>Parts
Not available if AusFleet Inventory module is used.
See also: Inventory module if you manage stock levels, pricing, stock takes etc. in AusFleet
Enter details as shown to create a list of parts that can be used to create Kits or added individually to jobs..
•Parts can be used to create Kits or added to jobs individually
•When included in a Kit as part of a service regime, the parts are added to the job automatically when the job is activated
•For simple record keeping, generic parts such as "Air Filter, "Oil Filter" "Brakes Pads" etc may be sufficient
•For more detailed recording, specific part codes may be required for different manufacturers/fleet items
•Supplier details may be added for each part if required

|
|
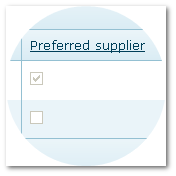
You can enter multiple suppliers for each part but only one can be selected as preferred supplier.
The preferred supplier defaults when the part is used but can be changed.
|
3. MMSB Parts
More>>Reference Files>>Repair & Maintenance>>MMSB Parts
Optional
Once parts have been entered, they can be allocated to different makes/models, to filter the parts list in jobs to display only those allocated to the make/model in the job.
This can be time consuming to set up but may result in easier ongoing use.
The reference file displays all Makes/Model combinations entered. Open any row and add parts that apply to each.
4. Kits
More>>Reference Files>>Repair & Maintenance>>Kits
See also: Understanding Scheduled Services
4.1 What are Kits?
•Kits contain a list of Parts and Requirements used in services
•They can be built from entirely individual parts/requirements or by adding parts/requirements to another Kit E.g. Kit A = (Kit B) + (other parts/requirements)
•Kits can also contain fixed rate time and costs for actual vs flat rate reporting
By creating Kits and service regimes, service jobs can be automatically created with parts and requirements attached, saving data entry time and improving accuracy.
Alternatively, parts and requirements can be added to each job manually but this can end up taking longer over time.
Kits are important if you:
•Operate an internal workshop
•Intend to schedule services and create jobs automatically
•Wish to minimise day-to-day data entry
•Need a full record of work carried out on your fleet
4.2 Before creating Kits, consider:
1. Are there standard components (parts/requirements) that are used in many Kits I will be creating? E.g. protective covers, standard checks?
If so, create these first so you can add them to other Kits and avoid adding the parts/requirements one by one to every Kit
Example:
•Create "Global Light Fleet Kit" containing "Seat cover", "Wear PPE", "Carry our visual condition inspection", "Check operation of all lights" to add to all vehicle-specific Kits.
•You can only add one Kit to another Kit
2. What level of detail do I need in Kits?
More detail requires more set up but the benefits are better accuracy and audit trail
•A simple "Service as per manufacturers handbook" can be applied to many different vehicles but lacks detail
•A specific listing of all parts/requirements for each Make/Model/Series gives excellent detail and full audit capability but takes time to build
3. How diverse is my fleet?
•A diverse fleet with plant, passenger vehicles and specialised equipment is likely to need a wider variety of Kits than a fleet with only cars.
•Within a light fleet, do you need a different Kit for each make/Model, or are you happy to use a standard Kit for different makes and models
When you know your needs, you are ready to start creating Kits.
4.3 Create Kits
More>>Reference Files>>Repair & Maintenance>>Kits
Parts and Requirements must be entered before creating Kits.
Step 1: Name the Kit
|
|
Click "Add New Record" and name the kit, considering how it is used and for which assets.
Remember:
•A Kit can be used in multiple Regimes if the parts/requirements are the same for both.
•A "base kit" comprising common parts/requirements can be created and used as a starting point for other Kits (See Step 3: "Copy an Existing Kit")
|
Step 2: Add Optional Details
|
|
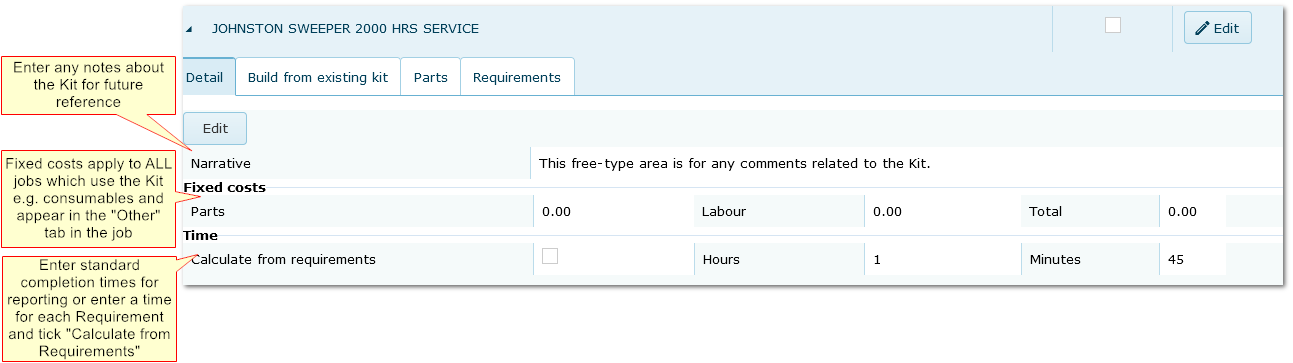
|
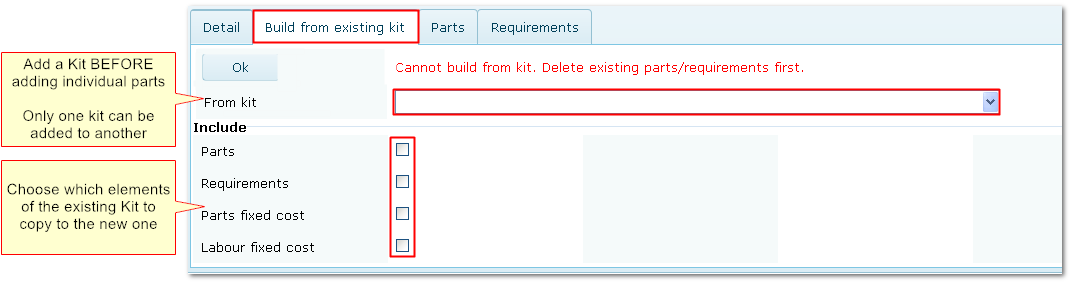
Step 3. Copy an Existing Kit (Optional)
This must be done before adding additional parts/requirements and only one Kit can be imported.
|
|
|
|
Step 4. Add Parts
Parts need to be added to the Parts reference file or Inventory module first.
|
|

|
|
Step 5. Add Requirements
Requirement reference file must be completed first.
|
|

|
5. Regimes
More>>Reference Files>>Repair & Maintenance>>Service Regimes
See also: Understanding Scheduled Services
Service regimes are essential for service scheduling.
If the regime is for Programmed Services, tick the "Programmed Service" flag next to the Regime description.
5.1 Scheduled Service Regimes
"Scheduled" services refer to the main, OEM service schedule.
Regimes combine one or more Kits (containing parts and requirements) with time and/or utilisation intervals.
Kits must be created before creating Regimes.
Step 1: Add and Name the Regime
Preferably in way that helps identification and is connected with the associated asset(s)
|
|
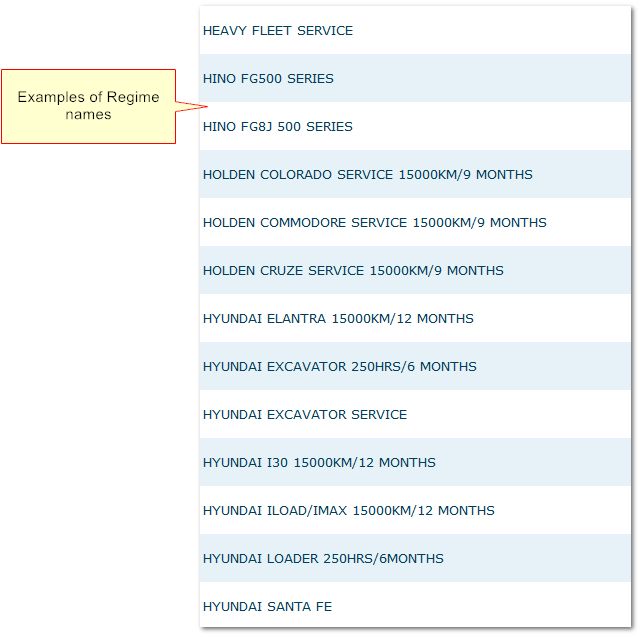
|
|
Step 2. Enter Service Intervals for Each Regime
The first warranty service is scheduled only once.
|
|
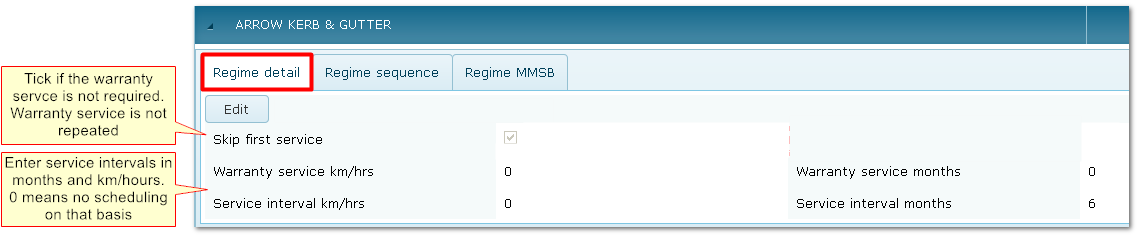
|
|
3. Enter Kits for Each Service Type in the Regime
This example has a once-only warranty service plus four ongoing service types with different Kits of parts/requirements (A,B,C,D).
A, B, C, D services cycle through the asset's lifecycle.
If services have identical parts and requirements, the same Kit can be used for different services.
|
|
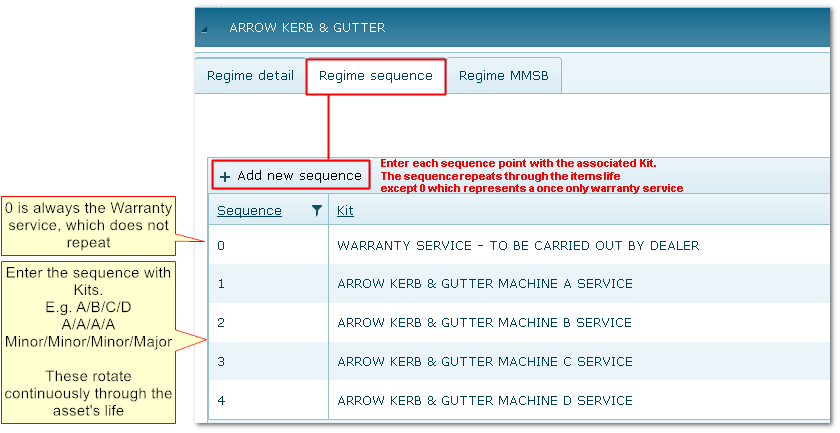
|
|
4. Choose the Makes/Models/Series Which the Regime Applies To
This set up ensures only appropriate regimes can be selected for assets.
|
|
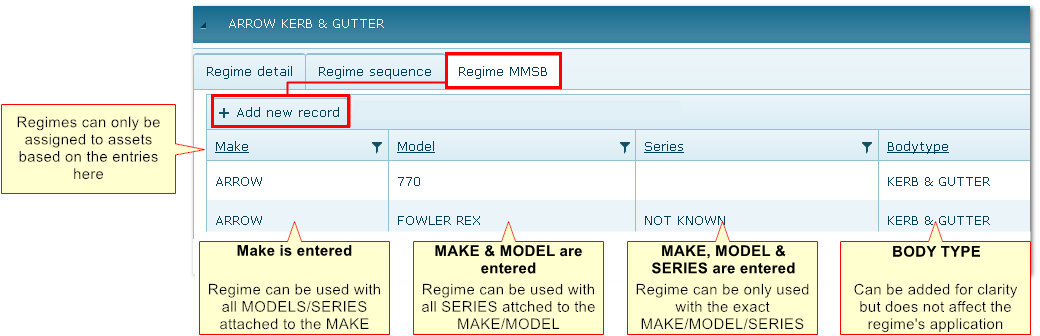
|
|