|
1. Add a Job
Jobs can be added in several ways:
Image Ref.
|
Method
|
Accessed
from
|
Job
Type
|
Optional Module or R&M Function
|
More
Information
|
|
1
|
Add Job
|
R&M Menu
|
Any but best for non-service jobs
|
R&M
|
Adding Non-Scheduled Jobs
|
|
2
|
Services Due
|
R&M Menu>>Services Due
|
Best method to create Programmed or Scheduled Services
|
R&M
|
Creating Service Jobs
|
|
3
|
Service Requests
|
R&M Menu>>Service Requests
|
Any but best suited to non-scheduled jobs
|
Optional
Module
|
Service Requests Module
|
|
4
|
Job Import
|
R&M Menu>>Job Import
|
Any to import jobs completed by external suppliers
|
Optional
Module
|
Job Import Module
|
|
5
|
Checklists
|
R&M Menu>>Checklists
|
Repairs, other non-service jobs
|
Optional
Module
|
Checklists Module
|
R&M Menu - Methods of Creating Jobs

When creating jobs using Add Job, Service Requests or Checklists, first step is to select whether the job will be completed by external suppliers or in internal workshop

2. Creating Service Jobs - Scheduled and Programmed
If necessary reference files and settings have been completed, the easiest way to create service jobs is using the "Services Due" option (number 2 in the menu above).
Repair & Maintenance>>Services Due.
Remember, each user can change the columns displayed and their order to suit their preference using the Settings>>Services Due option in the menu.
The Services Due list shows services due for a 12 months period in due date order - 6 months back and 6 months forward.
The dates can be changed using the "Due Date" filter in the menu.
If module set up is complete and regimes are attached to assets in Fleet>>MMSB Categories and Flags, the Services Due list updates automatically whenever a service job is closed or odometer is updated.
If Service Kits include parts, requirements and fixed costs these will be added to the job automatically.
Also see:
Understanding Scheduled Services
Understanding Programmed Services
Module Set Up - Requirements/Parts/Kits/Regimes
2.1 To Create Service Jobs for the Next Work Period E.g. Next Week
The default sort order is by "Due Date". This is the date AusFleet has calculated as the date the service should be done.
Then:
1.Choose jobs to generate by ticking the internal/external boxes, for internal jobs or those to be done by external suppliers, respectively
2.Click in the "Book In Date" cell and enter the date the job will start (this is the "Job Date" - it can be changed later once the job has been created)
3.Click "Generate Jobs" button
4.Options for printing/emailing jobs cards are displayed and jobs are created, with any parts/requirements contained in the Kit
5.When jobs are created you may want to use the Planning Calendar to help organise internal jobs in your workshops
The jobs are created and display in the main R&M Job List where they can be managed and edited - see Understanding the Job Card for the next steps.
The jobs you have just created are no longer shown in the "Services Due" list but can be shown by unticking the "Hide Scheduled Jobs" flag.
When the job is closed it is permanently removed from the Services Due list.
Services Due. (Columns may differ based on what is selected in Settings>>Services Due)
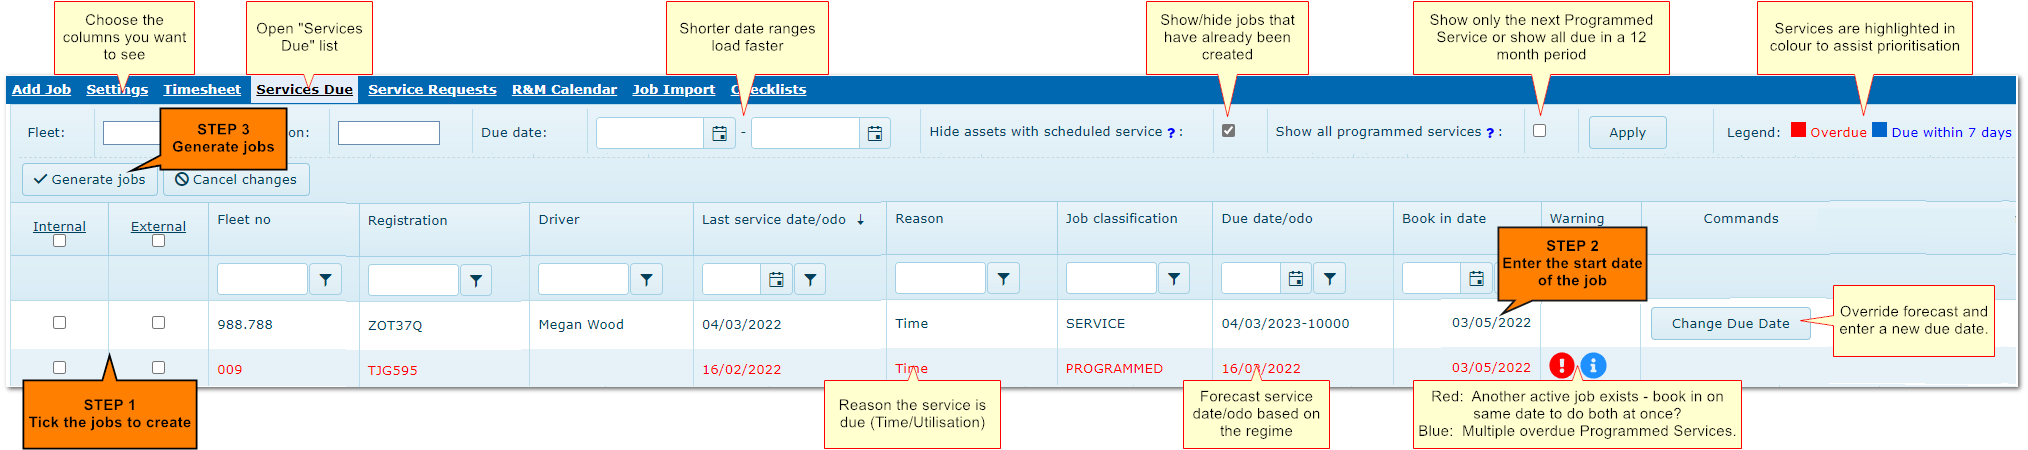

For accurate service scheduling it is vital that jobs are closed when complete and that accurate odometers are recorded.
Closing a job triggers update of the service schedule.
3. Adding Repairs and Other Non-Scheduled Jobs
This method can be used to add service jobs but the Services Due screen is recommended.
1.In the main R&M screen, click "Add Job"
2.Choose whether it is an internal or external job
3.Select the asset - many fields may populate based on defaults but some defaults can be changed. Regime fields are not available for non-service jobs
4.Choose the Job Class and Job Level that describes the job. These are useful when reporting on work done (E.g. Workshop Detail report).
5.Add any parts, requirements, personnel, timesheets and other details in the tabs in the job - see Understanding the Job Card for more details on each tab.
6.When jobs are created you may want to use the Planning Calendar to help organise internal jobs in your workshops.
With all jobs, it's important to enter the correct odometer/hour meter reading so that services, disposal etc. are scheduled correctly.
4. Adding/Editing Details in the Job
See Details in the Job Card
5. Setting Defaults to Populate Fields
When creating jobs, many of the fields on the job card can be populated using default values to reduce data entry.
Configuring these options to your preference can provide long term time savings.
For information on the related defaults, settings and reference files which can help to reduce data entry, see:
R&M Default Values
R&M Flags and Settings
Understanding the Job Card
6. Closing Jobs
Jobs should always be closed when finished to update service schedules and utilisation calculations and ensure reporting is accurate.
Click "Close Job" button in the job details to close it.
•A "Carried Forward" job can be created if a job is closed with parts not fitted and/or requirements not complete (see 5.1 below)
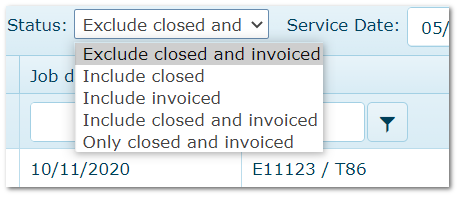
•Closed and Invoiced jobs can be updated if parameters 970/980 are ticked. If already invoiced, any cost changes create a new accrual for the difference
•Closed/Invoiced jobs are hidden from the default view. To see them use the Status menu
6.1 Carried Forward Jobs
If there are incomplete requirements and/or parts not fitted when closing the job, a Carried Forward job with missing items can be created.
This means incomplete work cannot be forgotten.
See the following parameters to configure this option:
More>>Parameters>>Flags and Settings>>660
More>>Parameters>>Default Values>>550/560/610
Close Job Screen
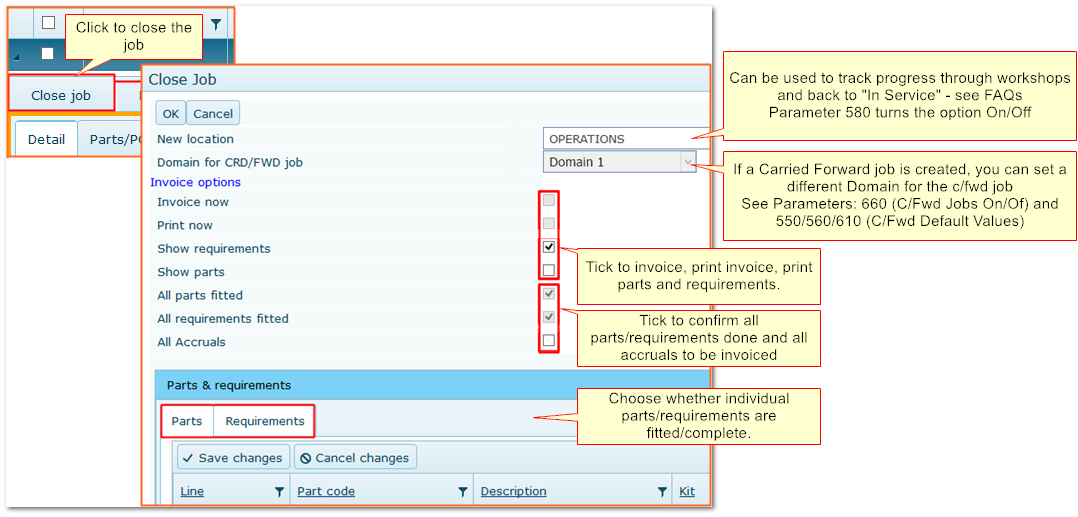
Parameters control update of Closed/Invoiced jobs

Change default view to see jobs with different statuses
|