|
1. Understanding the Job Card
Regardless of which methods you use to add a job, it will be shown in the main R&M job list, populated with default information.
The job cards for Internal and External jobs are slightly different and both are shown below.
2. Job Card for Work Completed in Internal Workshops
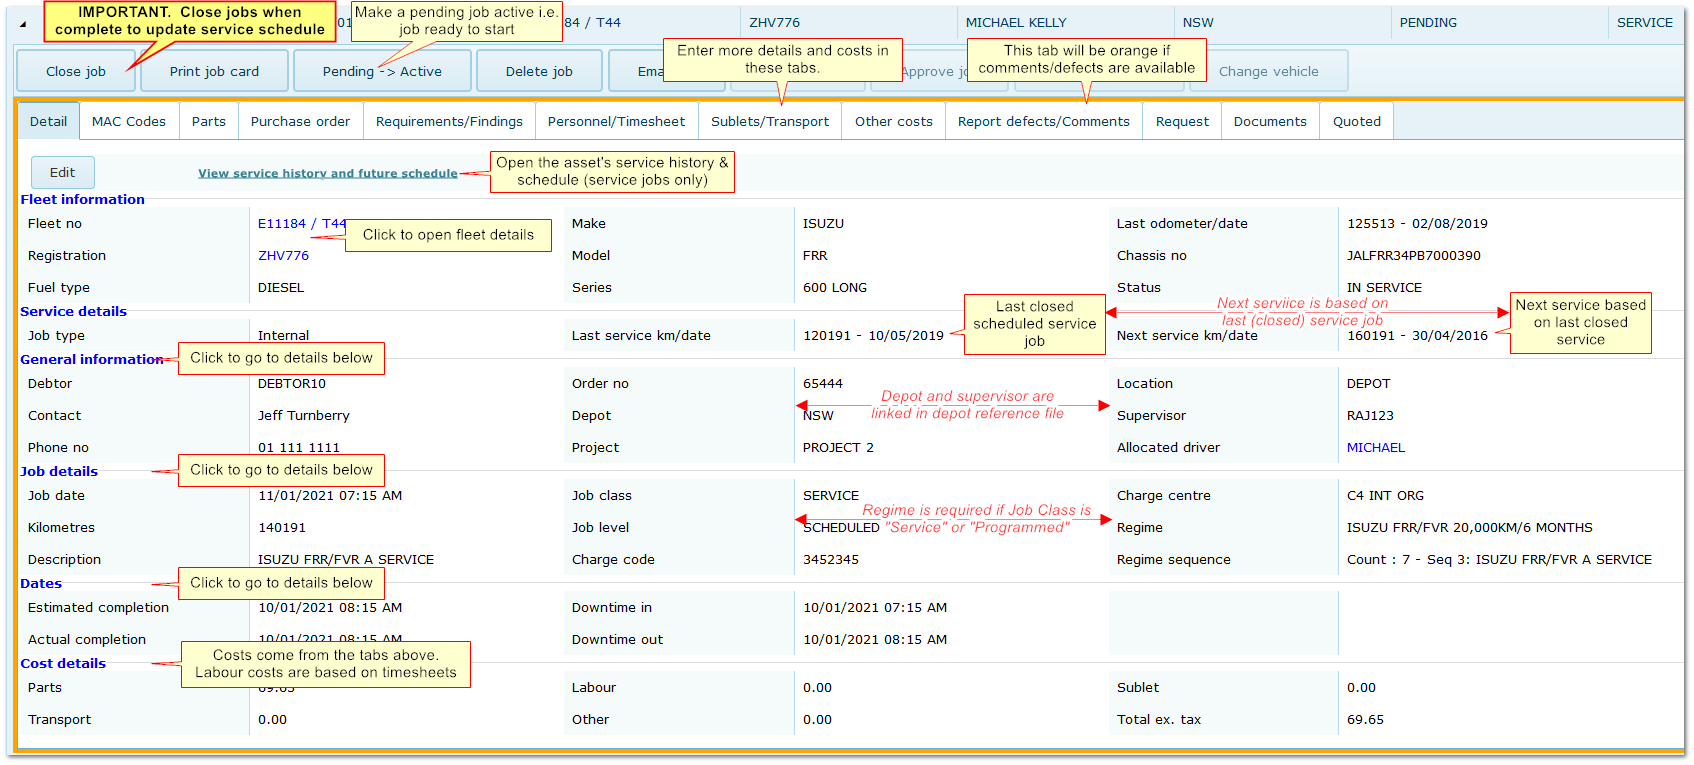
2.1 Details Tab
General Information Section
|
Back to Job Card
|
Debtor Details
|
oDebtors are allocated to assets in Fleet>>Ownership & Allocation
oJob costs accrue to and are invoiced to Debtors
oIf the Debtor reference file contains contact details, these are shown on the job card. If not they can be added manually
oDebtor can be made a mandatory field using More>>Parameters>>Flags and Settings>>990
|
Order Number
|
oThis can be used as required E.g. to record or issue authorisation numbers
oOrder number can be made mandatory using More>>Parameters>>Flags and Settings>>850.
oOrder number can be system generated or manually entered according to More>>Parameters>>Flags and Settings>>1020.
|
Depot
|
oDepot is a reference file representing different physical locations where work is completed
oA Supervisor can be assigned to each Depot in the reference file and will default on the job when Depot is selected
oThe Workshop Planning Calendar shows jobs per Depot for allocating staff to jobs
oIt can be made a mandatory field using More>>Parameters>>Flags and Settings>>1000
|
Project
|
oProject is a reference file
oJobs can be assigned to Projects for assessing aggregate cost of work related to each project and potential recharging or claims for project costs
oTo do so, include Projects as a column in the job list using "Settings" menu option; filter for the required Projects; select the jobs using tick boxes and "Export" job details to csv
|
Location
|
oLocation is a reference file.
oIt can be used for the normal location of the asset or to indicate whether it is "In Service", "In Workshop", "Grounded" etc.
oIt can also be used to track an asset through various stages of a job if workshop locations are included in the reference file E.g. for fit outs, commissioning etc. using tyre bay, electric bay, body shop, mechanical workshop etc., with the Location being changed as the vehicle moves through the various stages.
oThere is an option to change location when Closing jobs, to make it easy to move the vehicle back "In Service".
oInclude Location as a column using the "Settings" option and filter by locations to see which assets are in which locations at any time.
|
Supervisor
|
oA Supervisor can be assigned to each Depot in the Depot reference file and will default on the job when Depot is selected.
oThe default can be changed in the job.
oSee also: Depot
|
Driver
|
oThis is the driver allocated to the asset in Fleet>>Ownership and Allocation.
oPlace cursor over the name to see phone and email; click the name to see Personnel details.
|
Job Details Section
|
Back to Job Card
|
Job Date & Time
|
Job date is initially the date the job is created or the "Booked In date" if created from "Services Due".
It will update to the day that the job is moved from Pending to Active.
It represents the date the job will start and can be changed at any time.
The time defaults to the workshop start time set in More>>Parameters>>Default Value>>490.
Back dating of job date can be prevented using More>>Parameters>>Flags and Settings>>940.
|
Odometer/Hours
|
VITAL INFORMATION. Ensure the correct reading is entered to maintain accurate scheduling and utilisation.
The label changes depending on clock type set in Fleet>>MMSB, Categories & Flags. The field is not shown for non-clock items e.g. trailers, chainsaws.
|
Description
|
The description of the job.
Can be defaulted as the first Requirement in the job (E.g. 1000 Hour Service") using More>>Parameters>>Flags and Settings>>950.
Can be made mandatory using More>>Parameters>>Flags and Settings>>960.
Can be changed manually if required.
|
Job Class/Level
|
Important job classifications used extensively in reporting. Together they describe the job in terms of types of work.
Both are reference files in More>>Reference Files>>Repair & Maintenance.
For Service Jobs:
If Job Class is "Service" (I.e. a Scheduled Service) or "Programmed" (I.e. a Programmed Service) then a Service Regime is required.
If the job is created from the "Services Due" list, the regime and sequence will default to the next service based on the Service Matrix.
These Job Classes must be used to correctly identify service jobs and maintain service schedules.
Defaults are set as follows:
Scheduled and Programmed Service jobs: More>>Parameters>>Default Value>>570, 580 and 600.
Carried Forward jobs: More>>Parameters>>Default Value>>550 and 560.
Other jobs: More>>Parameters>>Default Value>>510 and 520.
|
Charge Code
|
This is a Fleet Reference file. A charge code is assigned to assets in Fleet>>Ownership & Allocation>>Ownership.
It defaults based on which asset the job relates to but it can be set manually on the job also.
It can be used for internal purposes specific to your organisation by linking work carried out on assets to specific charge codes.
|
Charge Centre
|
A reference file in More>>Debtors>>Fleet Invoicing Charge Centres.
Primarily used where a financial interface is in place to cross reference jobs with finance system codes/classifications but can be used as a general charge classification as per your organisation's requirements.
|
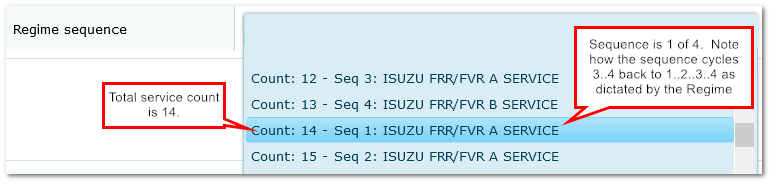
Regime/Sequence
|
If the Job Class is Service or Programmed then a service regime is required. This will default based on the regime attached to the asset in Fleet>>MMSB, Categories and Flags.
Under normal circumstances the system will choose the correct service based on the last closed service job but if you wish to change the service (for example to skip a service) you can do so. The regime sequence menu shows the forward sequence you can choose from.
If you do skip a service it will be marked as "Missed" in the service matrix.
|
Dates Section
|
Back to Job Card
|
Completion Dates/Times
|
These dates default to the date/time that the job is created.
Estimated Completion Date/Time updates when Personnel are allocated to the job in Personnel/Timesheet tab, based on the person's start time and expected hours.
Actual Completion Date/Time updates when Timesheets are completed in the Personnel/Timesheet tab, based on actual time on job.
Both can be changed manually as necessary.
Actual completion date can be used for forecasting next service instead of job date using More>>Parameters>>Flags and Settings>>640.
Backdating on actual completion date can be prevented using More>>Parameters>>Flags and Settings>>820.
|
Downtime Dates/Times
|
Downtime defaults to job date/time with a duration of 60 minutes and should be changed to reflect actual job time for downtime reporting.
|
4. Job Card for Work Completed by External Suppliers
The external job card is slightly different and the "Purchase Order" tab cannot be accessed because parts are not ordered for external jobs.
Only the differences are shown below. Please refer to the internal job card for details of other fields.
External Job Card
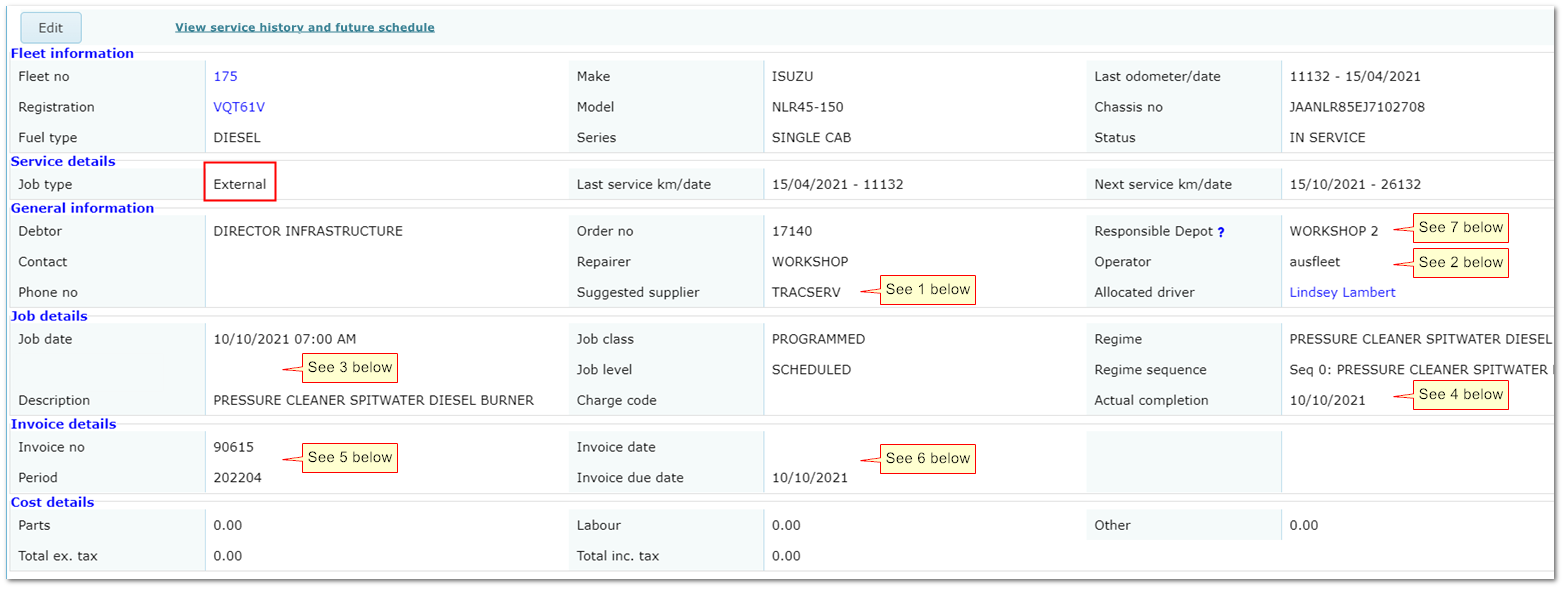
1. Repairer/Suggested Supplier
|
o"Suggested Supplier" can be attached "Job Classes" (More>>Reference Files>>Repair & Maintenance>>Job Class) to populate the field when Job Class is chosen E.g. Service: suggest Supplier A, Bodywork: suggest Supplier B
oIt's for guidance only and the actual repairer can be different
oOnly suppliers ticked as "Maintenance Services" in the Supplier Reference File will be shown in the Repairer menu
|
2. Operator
|
oThe person who created the job, based on the logged on user. For audit purposes. It cannot be changed
|
3. Clock Type/Reading
|
oIn the example above, the asset is a "non-clock item" (pressure cleaner) so there is no option to add an odometer/hour meter reading
oFor most assets, the field would be present to enter the odometer/hour meter
oAccurate readings are vital for maintaining correct service schedules - interfacing to GPS systems for odometer collection is recommended
|
4. Actual Completion Date
|
oDefaults to the job date
oCan be changed based on information provided by the supplier
|
5. Invoice Number/Period
|
oEnter the suppliers invoice number if required
oFinancial Period defaults to the period in which the transaction occurred, unless that period is closed, in which case it will be allocated to the next open one (See More>>Reference Files>>Administration>>Periods)
oPrevent the period being changed using More>>Parameters>>Flags and Settings>>1050
|
6. Invoice Date/Due Date
|
oEnter the suppliers invoice date and due date
oFor reference only unless a financial interface is in place to transfer the data to a third party system
|
7. Responsible Depot
|
oA responsible depot can be chosen for external jobs
oThe default is the Depot assigned to the asset in Fleet>>MMSB Categories and Flags
oIt allows job cards to be emailed to depots for external and internal jobs and depot staff see a simplified job list
oSee also: Sending Jobs to Depots
|
5. Entering Information in the Job Card Tabs
Click the boxes go to more details on each tab below.
Tab descriptions

6. Details Tab
See sections 2 and 3 above.
7. MAC Codes - "Maintenance Analysis Codes" for Maintenance Analysis
Seven optional categories used for R&M analysis to help assess maintenance programs, product selection, work practices etc.
Each category is supported by a reference file to ensure uniform input: More>>Reference Files>>Repair & Maintenance>>MAC Codes.
Choose the best match in each category (or just use those most relevant to your needs).

Three of the codes also appear in the My Job App, where tradespeople can complete them using menu selection in the App:
•Work Completed.
•Repair Reason.
•Repair Cause.
6.1 Export MAC Codes for Analysis
Tick jobs in the R&M job list and click "Export MAC Codes" button at the top of the list. This information is exported to spreadsheet in csv format:
|
Job Number
|
Job
Date
|
Fleet Number
|
Registration
|
Make
|
Model
|
Body
Type
|
Reason
for Request
|
Work Order
Type
|
Repair
Location
|
Repair
Type
|
Work
Completed
|
Repair
Reason
|
Repair
Cause
|
Back to Tabs
8. Parts Tab
Parts are added to service jobs automatically if the are included in the Service Kits. They appear in the Parts tab.
Parts can also be added manually in this tab.
Using Inventory Module?
|
Not Using Inventory Module?
|
|
Internal jobs: Issues and pricing are controlled by Inventory module.
External jobs: Choose parts from Inventory module but without affecting stock quantities or pricing.
|
Choose parts from a simple parts list in Reference Files.
or
Enter part costs in "Other costs" tab if you do not need to record part details.
|
8.1 Parts-Related Parameters
More>>Parameters>>Flags & Settings
|
590:
|
The "Fitted" quantity is automatically set to the "Issued" quantity.
|
|
600:
|
Displays warning if issue results in stock level falling below minimum for the part (Internal jobs only. Requires Inventory module).
|
|
680:
|
Allow parts to be deleted from a job if they are flagged as "Fitted". Otherwise, the "Fitted" flag must be removed first.
|
|
1100:
|
When closing a job, sets whether the ""Show parts on invoice" flag is ticked by default.
|
|
1170:
|
Choose whether to use long or short part description on jobs.
|
|
1330:
|
Allow parts to be issued even if stock quantity becomes negative (Internal jobs only. Requires Inventory module).
|
|
1340:
|
If a purchase order for the part was raised in R&M module (see below) , the price in the job will be updated to the price on the Goods Receipt (Internal jobs only. Requires Inventory module).
|
Back to Tabs
9. Adding Parts to a Job
Some of the details below are not available if the job is External or Inventory module is not used.
"Workgroup" is for Workgroup Report and can be made mandatory at More>>Parameters>>Flags & Settings>>650.
R&M Job Parts Tab

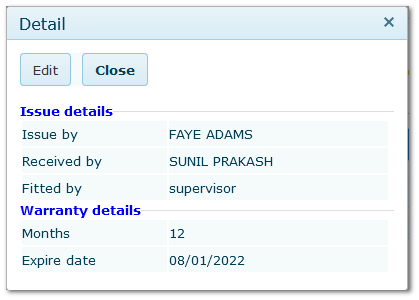
Click Zoom button to see who fitted/issued/requested each part.
These details default based on who last updated the figures but can be changed.
Back to Tabs
10. Raising a Purchase Order For Parts from Within a Job
Select Job>>Purchase Order tab
Requires Inventory module. Only for Internal jobs.
You can create a PO for any parts that have been added to a job without accessing Inventory module (User Rights permitting).
Parts ordered from a job must also be received in the job, not in Inventory module.
1.Tick the parts you want to order and choose the suppliers. Typing in the Supplier menu narrows the list.
2.You cannot order more than the Requested Quantity on the job.
3.Click "Create POs".
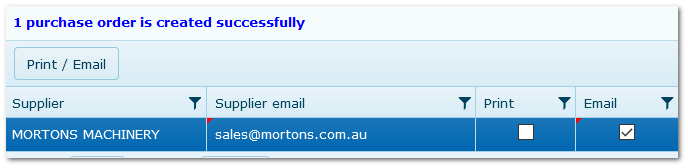
4.One PO is created per Supplier and you will be given the option to print or email the POs to the suppliers.
5.The rows turn blue after the POs have been created and will reference the PO number in the next to last column.
6.Click  to see details and resend email if necessary. to see details and resend email if necessary.
7.To receive parts when they arrive, click "Receive Parts" button. In the pop-up window, confirm quantity and price and click "Receive".
8.If received quantity is less then order quantity, the difference becomes a Back Order.
Creating a PO in RM Job

Choose whether to email or print and click button. Email address will default from Supplier reference file or can be entered manually.
Back to Tabs
11. Adding Requirements to a Job
Select Job>>Requirement tab
Requirements are a reference file
Requirements for service jobs are added automatically if the are included in the Service Kits.
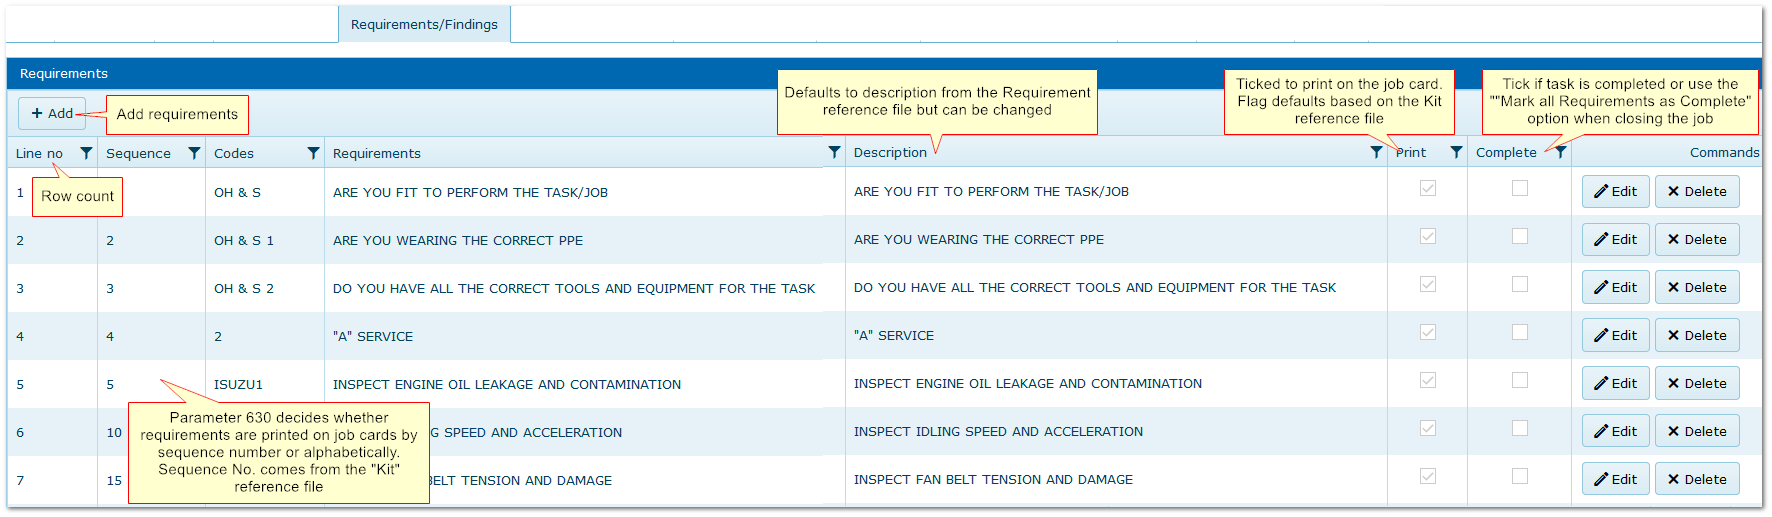
Requirements can also be added manually in this tab. They are printed on the job card if the Print flag is ticked.
1.Click Add.
2.Select the requirement(s).
3.Add alternative description if necessary.
4.Save.
The sequence number can be used to choose where in the requirement list on the job card it will be printed.
11.1 Flagging Requirements as "Complete"
•It is easier to flag requirements as "Complete" when closing jobs
•The "Close Job" pop up has the option to flag all requirements as complete to avoid doing one at a time
•Individual requirements can be unticked if necessary
Back to Tabs
12. Allocating Personnel to a Job
Select Job>>Personnel/Timesheets tab
See also: Timesheets (below)
Personnel Entry Is for allocating people to jobs in advance, with expected time for the work, and links to the Planning Calendar to help organise workload for the coming period
This then...
•Populates the Workshop Planning Calendar based on name/start time/estimated hours, so you can see how the week or month looks in advance and change dates/times/people as necessary.
•Creates a provisional timesheet for the person and estimated hours to reduce data entry when closing jobs.
•Changes made in the calendar update here e.g. changing start time or duration in calendar changes those details in Personnel tab.
•"Workgroup" is for Workgroup Report and can be made mandatory at More>>Parameters>>Flags & Settings>>650.
•Hour Code is important as it determines whether the time is chargeable or not. See Hour Type reference file for more information.
•All values entered here carry forward to a provisional timesheet EXCEPT Estimated Hours. This must be re-entered in the timesheet to avoid error if estimate is incorrect.

Back to Tabs
13. Entering Timesheets
Timesheets are the actual hours that people work on a job and if an hourly cost is entered, they accrues as Labour charges on the job.
If people are added to the job in advance (See 11. Personnel above) a provisional timesheet is created for them.
On the provisional timesheet, the time defaults to zero and must be entered manually to ensure the correct hours are recorded.
If the My Job app is used, timesheets are created automatically in this tab.
Timesheets can be added manually as required in this tab or using the "Timesheets" link on the R&M module menu. This method is easier when adding multiple timesheets per person.
•Either from/to times or total hours can be entered.
•Charge Type applies the hourly charge rates based on, in priority order:
oThe Debtor Type reference file if available for the Debtor
oThe mechanics rates from Personnel module
oOr they can be entered manually
"Workgroup" is for Workgroup Report and can be made mandatory at More>>Parameters>>Flags & Settings>>650.
13.1 Labour Charges
Labour charges on a job are based on timesheets entered.
The hourly charge rate is derived for the person's hourly rates in Personnel module or the labour charge rate specified in the Debtor Type reference file.
Total Labour Charge is calculated using:
•Timesheet Hours
•Charge Type (normal/overtime/standby)
•Hour code (determines whether the work is chargeable or not)
•Hourly labour rates based on Debtor Type or Personnel charge rates or manually entered
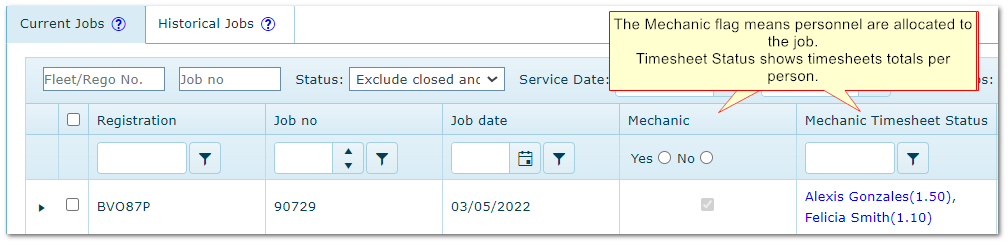
13.2 Viewing Timesheet Summary in R&M Main Screen
These columns in the main R&M screen can be selected in "Settings" on the R&M menu bar.
Back to Tabs
14. Sublets
Select Job>>Sublets/Transport tab
Sublets are specific requirements in an internal job that are completed by an external supplier.
•The "Cost"is applied to the job when the "Invoiced" flag is ticked.
•The default description can be changed to add additional detail.
•Quoted amounts do no have to be entered but allow a quote vs actual check.
Back to Tabs
15. Adding Transport Costs to a Job E.g. Towing Fees
Select Job>>Sublets/Transport tab
For any internal transport costs related to the job e.g. towing, call out.
•Select the Transport Vehicle used from those in More>>Reference Files>>Repair & Maintenance>>Transport Vehicles.
•The hourly charge rate defaults from the above reference file.
For external transport costs, use the "Others" tab.
Back to Tabs
16. Adding Miscellaneous Costs to a Job
Select Job>>Sublets/Transport tab
Use to add any additional, miscellaneous costs to the job. Fixed costs also appear in this tab.
16.1 Import Quotes
Use this button to add details/costs from the "Quoted" tab (see below).
16.2 Fixed Costs
Fixed costs can be added to jobs automatically in two ways.
Either or both of these methods may be used.
|
Add fixed costs to ALL INTERNAL jobs
More>>Reference Files>>Repair & Maintenance>>Fixed Charges
|
Add fixed costs to SELECTED INTERNAL OR EXTERNAL jobs based on Kit
More>>Reference Files>>Repair & Maintenance>>Kits.
|
|
Costs entered here are applied to every internal R&M job and are shown in the
"Other Costs" tab, classified by Transaction Type.
|
Enter the charges in service Kits.
If the Kit is used in a job, the costs appear in "Other Costs" tab.
|
Back to Tabs
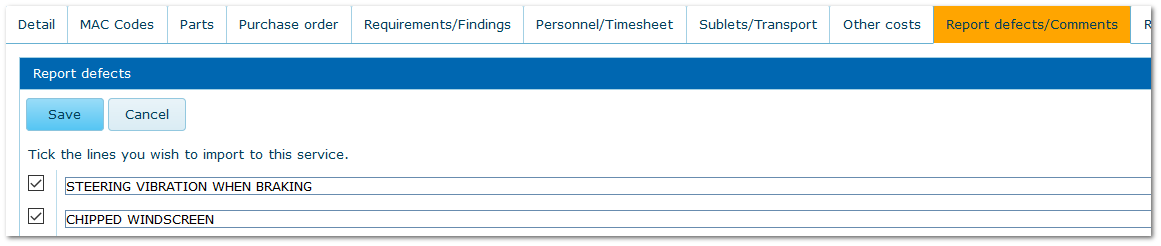
17. Add or Report Defects Found
Select Job>>Report Defects/Comments Tab
Defects reported in Hire module or via the My Job app appear here.
17.1 To Add Existing Defects to the Current Job
The tab is orange when there are pending defects.
1.Click Edit
2.Tick the rows to be added to the job
3.They will move from this tab to the Requirements tab
17.2 To Record New Defects Against the Asset
1.Click Edit
2.Enter one defect per row so they can be selected individually when being added to a future job
3.Save
Select existing defects to add to the job requirements
Back to Tabs
18. Add General Comments to a Job
Select Job>>Report Defects/Comments Tab
This is a free type area for adding notes related to the job.
Back to Tabs
19. Jobs Created From Service Requests Module - Requests tab
Select Job>>Requests Tab
Requires the optional Service Requests module.
Service requests or defect reports received from drivers using the AusFleet Requests Mobile App are received in the Service Requests screen in R&M.
If a job is then created from the Request, the request details are shown in this tab for easy reference.
Back to Tabs
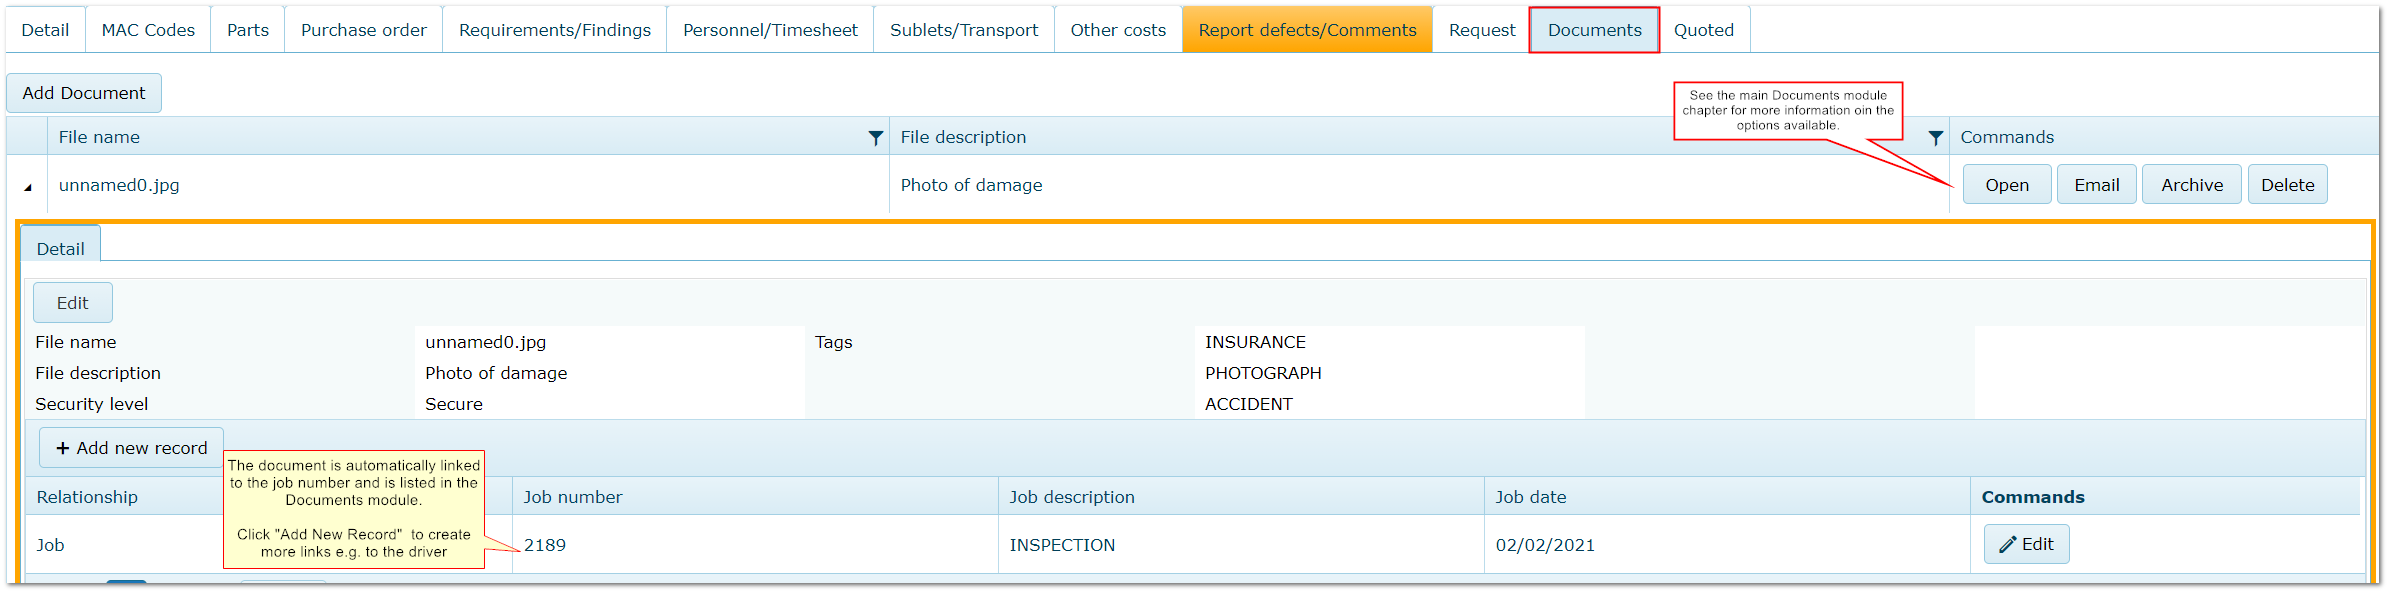
20. Adding/Uploading Documents Related to a Job
Select Job>>Documents Tab
Requires the optional Documents module.
Documents related to the job may be uploaded to the database here. They are automatically linked to the job number.
All documents uploaded to the database can be seen in the main Documents module.
Adding a Document

The Document is Automatically Linked to the Job Number
Back to Tabs
21. Recording Quote Details in a Job - Quoted Tab
Select Job>>Quoted Tab
If you have issued a quote for the job, the amount and transaction type (e.g. Labour) can be entered here.
If the quote is subsequently accepted and work is to commence, the quote can be imported in the "Other Costs" tab (see above).
Back to Tabs
|